Thursday, 2 August 2012

Coding (using 2 different codes!)

Tuesday Tutorial:

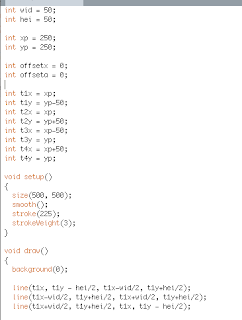
After finding that it was taking me a lot longer than it should of been just to change the position of one of my triangles or try to increase the size etc I realized that I had written my code using variable but in a way that meant I was still having to plot in all the individual numbers for each line of each triangle rather than having a few variables that control everything.

To fix this, i re-wrote (with help) a new code that uses the center point of the canvas as the center point for all the movement and sizing of shapes which makes it a lot easier to manipulate the variables which opens up a whole new range of sequences that a quick to create.
The only issue with the new code over my old one is that I am at a stage where I can only more the shapes in a symmetrical way (i.e cannot rotate the angle), this means that I can use my old code for any sequences I want to try that don't use symmetry and use the new quicker code for the rest of my form developments.


The screen shots above just show briefly the difference in the amount in variables in the 2 codes, the first being my new code with proper use of variables, the 2nd being my old code with far far far to many variables!!

This is something i need to improve on working with in the future.
More Sketch Developments


Screen shot of a starting point I thought I would try work with for a sequence where I have played with the line weight and reversing the triangles so they face in rather than out.


Another starting point for a sequence. Although I'm not sure where this will end up I really want the whole sequence to follow on from this one by focussing mostly on playing with different scales. This sequence will be a lot harder than the others as it does not use symmetry they way most of mine do.


This screen shot is from me just playing with completely breaking apart my form to create an almost opposite image to the original but still being very recognizable as the same form.

First Sequence and using 'Offset'

Friday Tutorial:

Finally completed my first sequence: (goes from bottom up)


This sequence was made using the OFFSET function which made it a lot quicker to do. I was able to move all the triangles at once a small amount at a time so that i could then decide on the 5 best shots to create the sequence. Above is also a screen shot showing the use of the offset coding.

Improvements to make on this sequence:
In tutorial it was pointed out that my first 2 shot decrease in size very obviously then my next 3 shots are all the same size. To make this sequence better I could make all my end shot a lot smaller so that the sequence becomes a decrease right the way across.


Adaptable Form

This is the form that I decided on as my final adaptable form. I like that it is simple but having four shapes making up the form means there are plenty of opportunities to break it apart and 'blow' it up. I also preferred the white lines on black background because I think it makes the forms stand out more and look less like stick man style!


Deciding on Form


These are some screen shots of me playing around trying to decide on my final adaptable form for my starting point. I decided I wanted to work with triangles, probably 4, but I wanted to try adjusting scale and background/stroke color, position etc to see what appealed the most.

Drawing my Form

These are some of my sketches on developing my final form that I will use as my start point. Because I am still not feeling very confident about the coding as I have never done any computer science etc before I really want to go for a shape that is VERY BASIC but will give me plenty of options to generate different sequences.


Tutorial 3: Using the Grid and Variables

Grid Game:
This tutorial was all about seeing the processing canvas as a grid and understanding what the numbers mean in terms of plotting basic shapes and how to apply that.
Instead of creating shapes using code I loved how we instead had to compete to be the first to physically drew the shapes on a grid.
This activity really clarified how simple it should be to create a rectangle/circle/line and position it correctly.


Variables: 
This tutorial also introduced the idea of variables. This is something that I think I will need to give a lot of practice to get my head around as I found it a lot to take in all at once. 
This was a far as I got on my own re-creating the shape we used in tutorial using variables rather than plotting each line. I can see how it is a lot faster and a much more effective option and I will have to practice using it for my final form.