
Friday, 3 August 2012
Another Inspiration...
Someone brought in a Rubix Cube as their playful object to one of the tutorials which i thought was another fantastic example of the kind of project that the brief is looking for. I loved the idea of how it combines touch with sight and is such a simple idea yet so difficult to execute. Rubix cubes confuse the senses by often not going the way you think it will, for example you think a certain move will create a certain effect but often it ends up changing something else along the way. This is why so often you can have 2 or 3 sides that have all but one square complete with the same color but one more and it ruins all the sides at once. I think a rubix cube is a perfect example of a cause and effect project.


Thursday, 2 August 2012
Final Adaptable Form Layout

This is my final board of 5 sequences from one adaptable form (top right corner). As well as having each individual sequence show the process of how the form is adapted, I have tried to link my whole board together as one to make it like one piece of 25, not just 5 pieces of 5. I have done this by increasing the line weight over time. I have also tired to keep some balance in my board by avoiding the temptation to make every sequence end with the shape coming neatly together, instead in my last 2 sequences I make my shape 'blow up' to appear larger and less contained at the end.
Coding (using 2 different codes!)
Tuesday Tutorial:
After finding that it was taking me a lot longer than it should of been just to change the position of one of my triangles or try to increase the size etc I realized that I had written my code using variable but in a way that meant I was still having to plot in all the individual numbers for each line of each triangle rather than having a few variables that control everything.
To fix this, i re-wrote (with help) a new code that uses the center point of the canvas as the center point for all the movement and sizing of shapes which makes it a lot easier to manipulate the variables which opens up a whole new range of sequences that a quick to create.
The only issue with the new code over my old one is that I am at a stage where I can only more the shapes in a symmetrical way (i.e cannot rotate the angle), this means that I can use my old code for any sequences I want to try that don't use symmetry and use the new quicker code for the rest of my form developments.
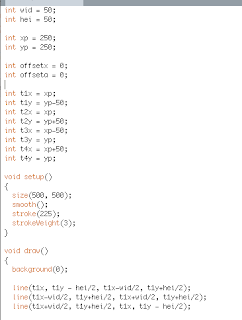

The screen shots above just show briefly the difference in the amount in variables in the 2 codes, the first being my new code with proper use of variables, the 2nd being my old code with far far far to many variables!!
This is something i need to improve on working with in the future.
After finding that it was taking me a lot longer than it should of been just to change the position of one of my triangles or try to increase the size etc I realized that I had written my code using variable but in a way that meant I was still having to plot in all the individual numbers for each line of each triangle rather than having a few variables that control everything.
To fix this, i re-wrote (with help) a new code that uses the center point of the canvas as the center point for all the movement and sizing of shapes which makes it a lot easier to manipulate the variables which opens up a whole new range of sequences that a quick to create.
The only issue with the new code over my old one is that I am at a stage where I can only more the shapes in a symmetrical way (i.e cannot rotate the angle), this means that I can use my old code for any sequences I want to try that don't use symmetry and use the new quicker code for the rest of my form developments.


This is something i need to improve on working with in the future.
More Sketch Developments

Screen shot of a starting point I thought I would try work with for a sequence where I have played with the line weight and reversing the triangles so they face in rather than out.

Another starting point for a sequence. Although I'm not sure where this will end up I really want the whole sequence to follow on from this one by focussing mostly on playing with different scales. This sequence will be a lot harder than the others as it does not use symmetry they way most of mine do.

This screen shot is from me just playing with completely breaking apart my form to create an almost opposite image to the original but still being very recognizable as the same form.
First Sequence and using 'Offset'
Friday Tutorial:
Finally completed my first sequence: (goes from bottom up)


Finally completed my first sequence: (goes from bottom up)


This sequence was made using the OFFSET function which made it a lot quicker to do. I was able to move all the triangles at once a small amount at a time so that i could then decide on the 5 best shots to create the sequence. Above is also a screen shot showing the use of the offset coding.
Improvements to make on this sequence:
In tutorial it was pointed out that my first 2 shot decrease in size very obviously then my next 3 shots are all the same size. To make this sequence better I could make all my end shot a lot smaller so that the sequence becomes a decrease right the way across.
Adaptable Form
This is the form that I decided on as my final adaptable form. I like that it is simple but having four shapes making up the form means there are plenty of opportunities to break it apart and 'blow' it up. I also preferred the white lines on black background because I think it makes the forms stand out more and look less like stick man style!

Deciding on Form


Subscribe to:
Posts (Atom)